Sunday, 29 September 2013

Lorretta Lux effect

In Photoshop use the Quick Mask Tool to select the subject’s head, click on the tool (located at the bottom of the tools panel) and select a brush with the foreground set to black. Paint over the area you want to select. If you make a mistake and paint over an area you don’t want, change the brush to white and paint the mask off again.
When you have finished painting over the area, click on the quick mask tool again and you will see marching ants going around your selection and the edge of your image. This is because everything but your masked area is selected. Go to Select > Inverse to select your masked area. Press cmd-J to make a new layer from your selection.

You can now use Edit > Transform > Scale to increase the size of your subject’s head. Make sure that you have the link between the W and H selected so that you increase the size proportionally.
To place the larger head layer correctly, reduce the Opacity of the layer and use the Move Tool to line up the layer with the original one.
Return the Opacity slider to 100%. You need to get rid of any overlap on your image from the larger head layer. Add a layer mask by clicking on the layer mask icon at the bottom of your Layers Panel (the rectangle with a circle in it to the right of the fx icon). Use a black brush to paint over the areas that you don’t want to show up. You will need to zoom in when working and probably turn your layer off and on to check your progress. As with the quick mask tool, you can paint areas back in using a white brush. Then merge the layer down to the one below using Layer then Merge Down.
For the next step, add a Hue/Saturation Adjustment Layer – make sure you do this from the adjustments panel rather than going to Image Adjustments and affecting layer 1. Looking at the face, reduce the saturation by moving the slider to the left. To only have the effect on the skin, you need to block out the effect form the rest of the image using the layer mask. As you only want a small amount to show, with the layer mask selected, press cmd-I. This will fill your layer mask with black and block the de-saturation effect from the entire image. Select the white brush and paint over the skin and hair to show the de-saturation where you want it. Merge down again.
The eyes can be distorted with the Warp Tool. Use a Lasso to select an area around the subject’s eyes. Press cmd-J to create a new layer. Go to Edit > Transform > Warp and a grid will come up. You can click on the handles or on the lines and pull them around to change the shape of the eyes.
Following the style of Lux’s image, soften the skin slightly. You can do this by adding a Gaussian Blur or by using an inverted High Pass Filter. For the latter, flatten your image (Layer > Flatten Image) and produce a copy layer (cmd-J). Choose Filter > Other > High Pass. Set the Radius so the image outlines are just showing through the grey and click ok. Change the layer Blend Mode to Soft Light (or overlay if you want a stronger look).
At this point you will notice that the image has been sharpened rather than softened. Press cmd-I to invert the effect and soften the skin. Since you only want this effect on the skin, add a layer mask and fill it with black (cmd-I). Then use a white brush to paint the softening effect back in on the skin. Avoid the eyes and lips to keep a more realistic effect.


Original image
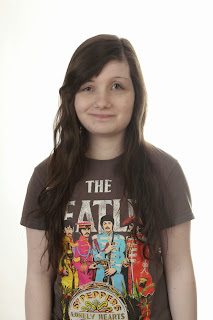


Edited image


HDR using bracketed images

HRD

My starting images:


 To create a HDR image first you will need to set up your camera so it takes 3 bracketed images, this just means that 1 images will be 1 normally exposed, 1 under exposed and 1 over exposed. You then select the 3 images in adobe bridge and go to tools, photoshop and merge to HDR.
You now need to change your image to 16-bit or 8-bit to use it. To do this go to Image then Mode and 16-bit or 8-bit. An HDR conversion dialogue box will appear, select Local Adaptation from the drop down menu. The box will show a tone curve and histogram use the sliders to drag the highlight point and shadow point in to the edges of the histogram. You may also want to add some more points to your curve and adjust them to increase contrast.
You will then need to look at the Radius and Threshold sliders to try to avoid any halos in your image. It is likely that you will need to lower the radius amount by sliding to the left. Press Ok when done. You will then have your HDR image.
You can either add any adjustments in PhotoShop to finish the image or in Adobe Camera Raw. To do the latter, use Save As and save your file in the TIFF format. This will allow you to edit the image further in ACR. (ACR will not allow you to open a PSD file.)

Open the file in ACR. Depending on your image, move the Recovery slider to the right to bring back detail in the highlights — if you have clouds in the sky, this should help to make them more dramatic. You can adjust the Temperature if you wish and increase the Vibrancy. Drag the Clarity slider to the right to increase the contrast in the midtones, creating a sharper looking effect. Once you have made any adjustments you want to, click Open. This will bring the image back up in PS and you will want to finish by using the Unsharpen filter and then save back as a jpeg.

My HDR images


HDR

 Original image
 HDR image


Sunday, 22 September 2013

Split toning

 Split toning is changing the colour of the image, so that the colour is some where in between black & white and colour.


 Using bridge, you turn your image into black and white
 There is then a split toning button, you click on this and colour sliders will come up, using this you will adjust the colour.
You then change the hue and saturation.

Dodge and Burn on photoshop

Dodge - lightens the image
Burn - darkens the image
Both of these processes can be done in a traditional way in the dark room or on photo editing software such as photoshop.


As you can see here there is the dodge and burn tool on photoshop. Using the dodge tool I lightened the bus and the building.


Using the burn tool to make the sky darker in places


Original image


Edited image, I think that this has worked well and the image now looks surreal.


Sunday, 15 September 2013

Introduction to experimental imagery in photography


In this unit we will:
1. Explore techniques, materials and processes.
2. Create image.
3. Understand how processes work by doing research.
4. Create image, evaluate and refine.

Task
Create 2 or more images (at least one digital and one using traditional methods), for the December issue of the magazine 'Oh Comely'.